The travel trailer virgins made their first primitive camping foray over a four-day and three-night weekend.
By primitive we mean there was no Wi-Fi. Heck, there was no phone service. We still had full hookups including, of course, water, sewer, and electricity. But not being able to have Netflix or Amazon Prime on the TV made a rainy weekend less interesting than it might have been.
The good news is that the half-ton Yukon with the small (5.3 liter) engine made the 120-mile trip, mostly on fairly vertical Missouri Ozarks roads and kept all gauges in the green. On the interstate highway system, it seems that about 62 miles per hour (indicated) is about the comfortable cruising speed. The two-lane state highways brought that down to about 55. Speed could be maintained up some fairly steep grades. All in all, the last doubts about the Yukon were eliminated. Next stop is Chattanooga, Tennessee.
The new TV in the living room worked without blowing up. The DVD player works. The CD player works, and the outside speakers do too. All systems, in a nutshell, are now go.
The weekend was a bit rainy (the remnants of the hurricane seemed to wander all of the way to Missouri), so the hammock didn’t get used but the corn hole game (who dreams up these names?) got assembled and at least tried out.
Note from Pamela: we were both terrible at the Corn Hole game, but we will persevere.
We did play poker. David was teaching Pamela how to bet chips and play the game and she won the poker show down. Pam won the poker showdown, aided by her rank-of-hands cheat sheet. The Farkle game offers entertainment too, but wasn’t nearly as much fun as playing poker. The interesting thing was neither of us had played card games in literally years, so we couldn’t remember how to play Gin Rummy, Pinochle, Hearts, etc. We did not have internet access to find out nor could we make cell phone calls to ask any friends. We now own a book of 100 card games to play just in case we are in this predicament again.
Now for Pam’s report on meal preparation without setting off the fire alarms and heating up the camper.
A friend gave me an Induction 1-burner cook top. So, I purchased a skillet and lid and also have a 5-way use Dutch oven type of pot that will work on the Induction Burner. May I just say that all RV’s should replace their gas stove tops with induction cook tops. It does not heat up the camper, the temperature is very easily controlled and cooks evenly. Loved it.
When it is raining for two days and the mosquitoes are out this is where I cook. On Saturday afternoon the sun came out and there was a nice breeze, so I was able to cook on our Blackstone Dash grill and flat top. I really liked this new experience in cooking. I felt like I was a cook in a diner. It heated up nicely and evenly. I cooked brats and hash browns for us with plenty of room. Clean up was easy and then the whole unit packs up like a piece of carryon luggage and goes in the basement storage.
The Upgrade—Friction Fit Shelves
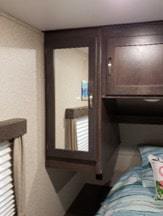
The other interesting development was using the freshly installed shelves in the tiny little closets in the bedroom. Since the travel trailer is, well, a travel trailer, Dave was reluctant to do anything that involved putting screws or nails or whatever into the walls. Pam ran across a video of a guy showing how he had made a “friction fit” set of shelves. It seemed like such a good idea Dave made some and they worked. Notes from Pamela: Love the converted closet to 3 deep but usable shelves. So much better than the mess we had in there before. We still have the hanging rod in our pantry so if anything must be hung there is plenty of room.
So, for those of you who think this is a good idea, here’s how:
First—Material
You won’t need much. I used two sheets of Masonite. I had scrap 1 X 4’s around and ripped them on the bench saw but firring strips (available at Lowe’s, Home Depot, Mednards or your local lumber yard if there is still one around) would work as well for shelf supports and spreaders. You’ll probably need a jig saw. And that’s about it.
The idea is to make two sides which will simply hold runners on which to lay shelves. The shelves will, in turn, hold the sides apart, tight against the trailer walls, with no nails or screws or anything else involved.
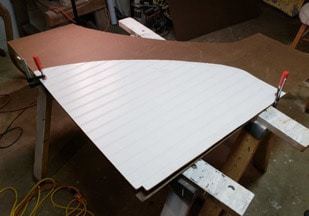
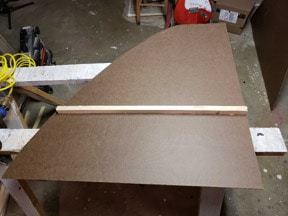
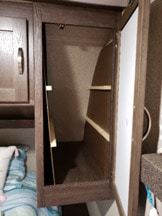
Step one is to make the sides. In our case, since the travel trailer follows the new standard of a curved front, this got to be a bit of a tricky problem. To start, Dave just measured from the front bottom corner to the top and the back. Both measurements were about 34 ½ inches so it was a straightforward matter to make the first approximation of a template for the sides. A simple arc with a 34 ½ inch radius served as the starting point.
Turned out, the front isn’t actually a simple circle. Since the template was a piece of paneling, this required several cuts with the jigsaw to get the arc right. This is not a critical dimension, but Dave likes things to look good, so he wanted to get it close. He used a piece of paneling for the template, but cardboard would work as well, and, in a pinch, newspapers could do but they are flimsy enough that you don’t really want to use that. Here’s my template in action.
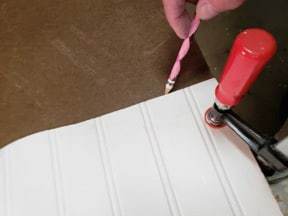
Make your marks good and heavy. They’ll be hard to see on the Masonite.
From then on, the process is pretty straightforward. Basically:
- Decide how many shelves you want. In our case, Dave settled on two, allowing sufficient space between each to be usable. With the floor of the closet, then, there are three usable flat surfaces.
- Decide on spacing Since the height was approximately 34 inches Dave used 11 inches as the spacing, dividing the closet into three approximately equal shelves. Again, none of these measurements are critical and you can adjust as needed to fit your needs.
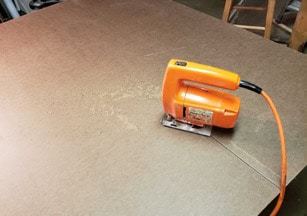
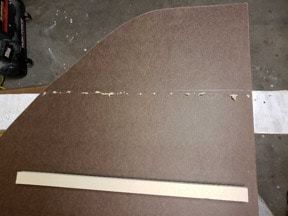
- Cut the side panels. For us, this involved marking from the template and then cutting with a jig saw. If you’re blessed with straight angles a circular saw (aka a Skilsaw) would probably work.

- Attach the shelf supports. Dave is a bit of a fanatic on things STAYING together so he glued and used brads as clamps. Again, just use Liquid Nails (or any other brand of structural adhesive for that matter) and since this won’t be actually structural, use it sparingly.

Here is the first shelf support installed.  Cut the shelves. Now this IS a critical dimension. The shelves need to fit tightly enough that they will make a friction fit between the sides and hold everything in place. They should be exactly the width between the side panels.
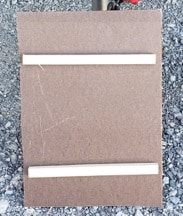
- Measure and cut two “spreaders” for each shelf. This is optional. Even a Masonite panel would probably be strong enough to hold a few T-shirts, socks, underwear or whatever but, again, Dave is a bit fanatical about such things. Also, the “spreaders” will help hold the side panels in place. The “spreaders” should fit tightly between the shelf supports. Here is a shelf with the spreaders installed
- Dave made sure that the Masonite was smooth side out that would be visible. Just a little conceit on that one.
- Here are the side panels when ready

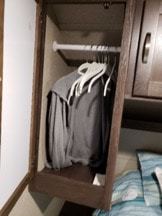
- Here’s the closet to begin with


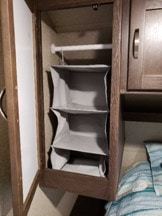
- Here’s the organizer we’re replacing
- Setting the sides in place
- The shelves hold them apart and snug.
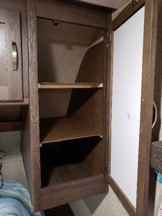
- With everything cut and ready, put the side panels in and then the shelves. When you’re done you’ll have this!
 Cut the shelves. Now this IS a critical dimension. The shelves need to fit tightly enough that they will make a friction fit between the sides and hold everything in place. They should be exactly the width between the side panels.
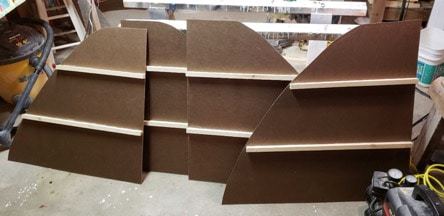
That’s about it from this trip. Next stop Chattanooga where we’ll be spending a relatively extended period of time in the portable motel room. We’ll let you know how that one goes.

You will LOVE Chattanooga the smokey mountains are so beautiful. If you get a chance go see their semi pro soccer team play. You’ll become an unofficial Chatta-hooligan and see how it’s done. They have an almost European love of the game and a great food truck scene, If you go in the spring or summer you can work in some white water rafting at the Ocoee river. My friend guides there at the Natahalia Outdoor Center. It’s the best. (PS really enjoying Project 24 thanks for sharing your knowledge.)